
How To fix Pajero/Shogun/Montero Stuck horn problem – Step by Step guide
One of the most annoying problems of the Pajero/Montero is the horn which tends to get stuck out of nowhere and wakes up your whole neighborhood.
There are 2 main solutions for that issue.
1. The easy solution.
2. The better one 🙂
I will describe both of them, but will focus on the second solution.
First, Let’s understand the reason of the problem.
The horn switch is actually 2 soft sheets of metal which are being “pressed” one against each other every time you push the horn on your steering wheel center. You can see that “switch” in the pictures later in the article.
The problems starts while these metal sheets stick one to each other and then it is like you push the horn.
PAY ATTENTION!
The horn metal sheets located right next to the air bag.
Dealing with it might be dangerous and you are doing it on your own responsibility.
The writer is not responsible to any damage or injury that might happen during that work or as a result of it.
Disconnect the battery negative and positive cables and wait for 60 seconds before continuing the work.
Now to the solutions:
In both of the solutions you have to use a Philips screwdriver to unscrew and remove the 3 bolts in the red circles, then, carefully, remove the plastic covers.

The easy one: Add one more switch that cuts the electric circle and operate the horn when you press on it.
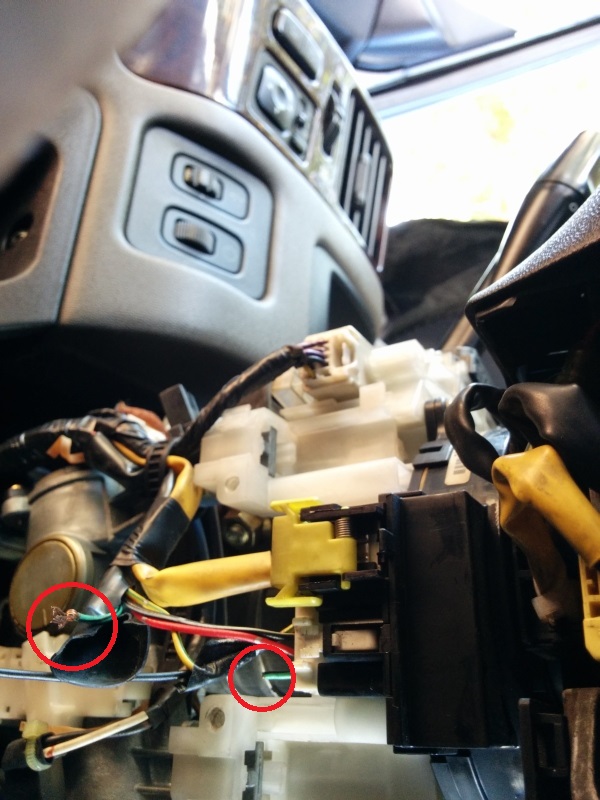
That was the solution which I had in my Pajero when I bought it. In the first picture you can see a small hole on the left side (not circled), that is where the previous owner put the switch.
In order to do it, you have to cut the green w/black stripe wire, extent it and connect the edges to a switch.
In the picture below you can see the edges of the wire and the relevant connector.
Connect the battery, verify that the new switch is working, put the plastics back and you are good to go.
The second soltion:
Tools:
Philips screwdriver
Flat screwdriver
8mm socket and 8mm wrench
Flexible extension to the 8mm socket
Drill with a 4.5mm auger
Materials:
4.8mm rivets
Rubber stripe – I used a bike wheel tube
Isolated ducking tape
Time estimation: 1-2 hours.
Before we start: we are going to remove the airbag. Make sure that the battery is not connected and that you waited 60 seconds before starting to work (After disconnecting the battery).
We are not responsible to any damage or injury due to that job.
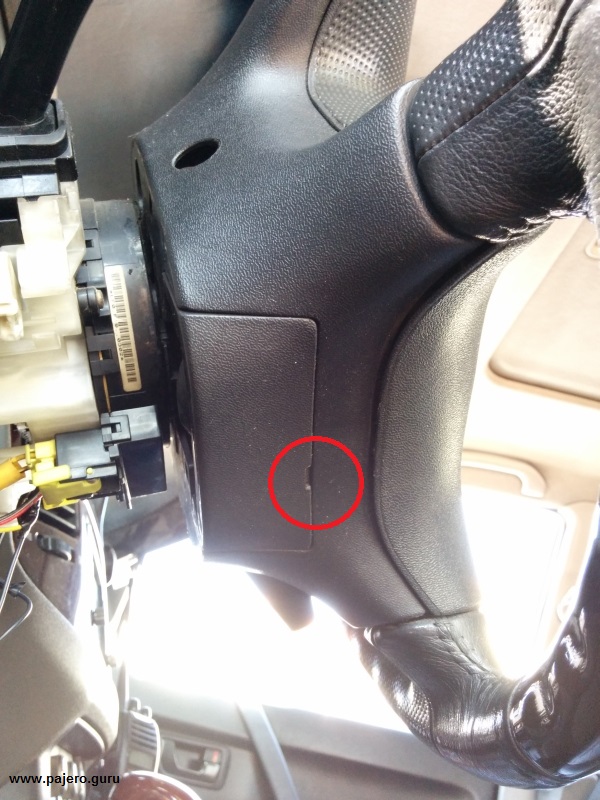
1. Using a flat screwdriver, remove that small plastic cover on the steering wheel
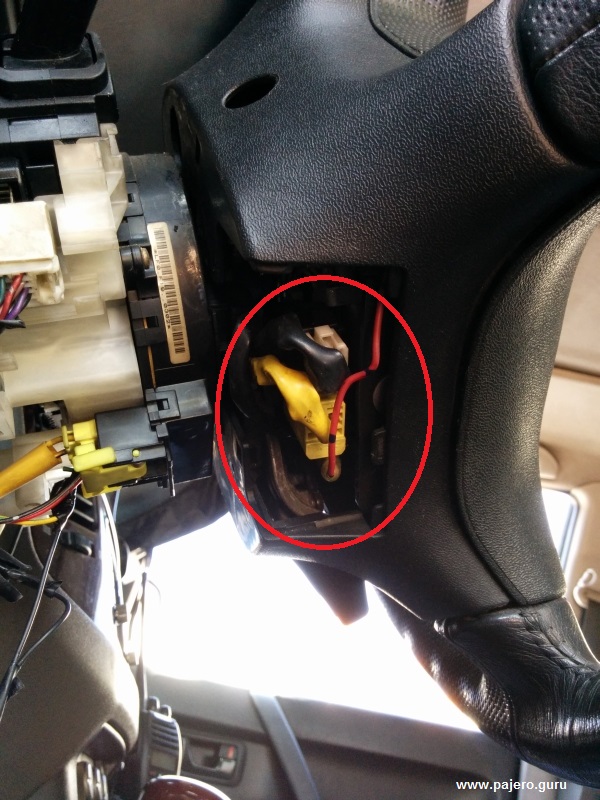
2. Disconnect the 3 connectors – Yellow, white and red (the red is one wire connector)
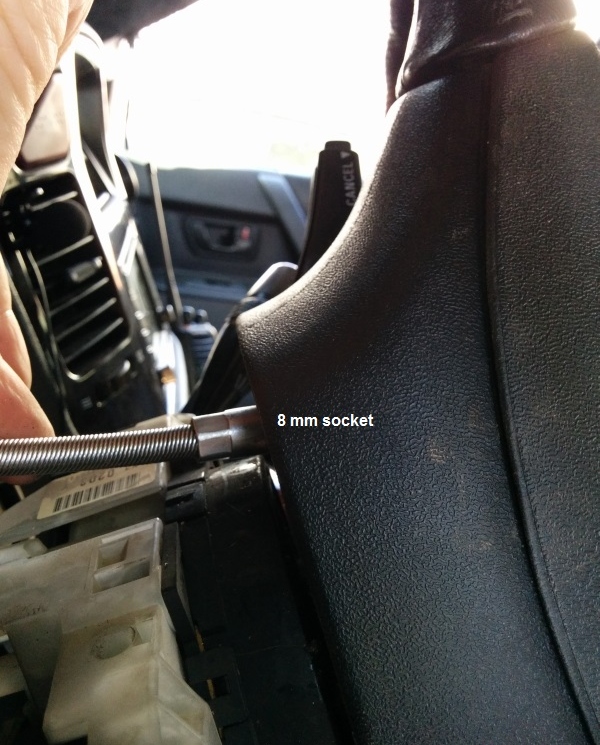
3. Using a 8mm wrench, open the nuts, there are 4 nuts that holds the airbag/horn in place, 2 of then are here, at the bottom and other 2 are at the upper side of the steering wheel, you will see the holes there.
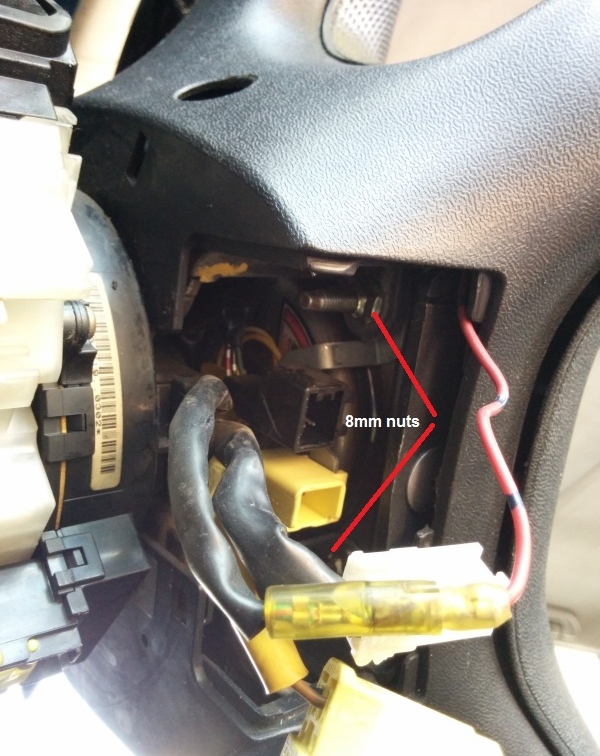

That is the location of the upper nuts, use the 8mm socket with the flexible extension to open the nuts.

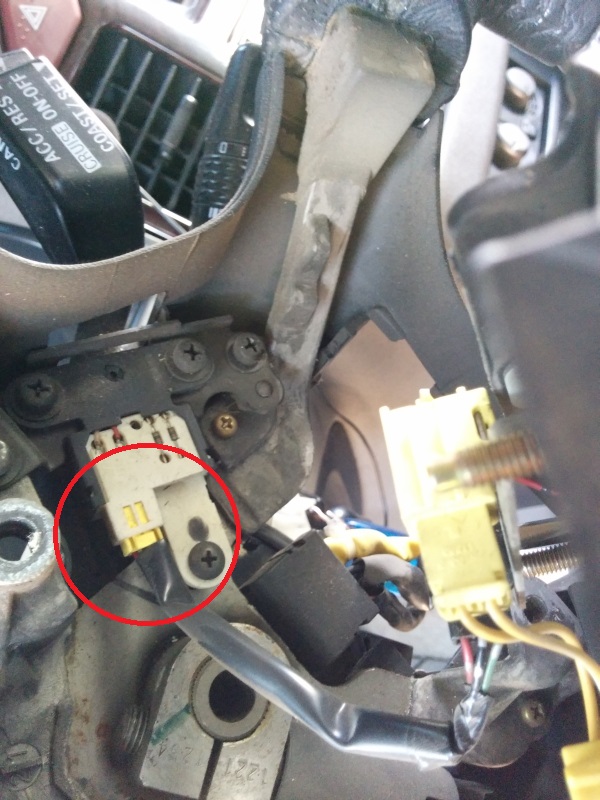
4. Carefully, remove the “center” of the steering wheel – the airbag, you will see a yellow connector there, disconnect it.
5. The metal sheets are hiding behind the airbag. In order to reach them, you have to remove the airbag.
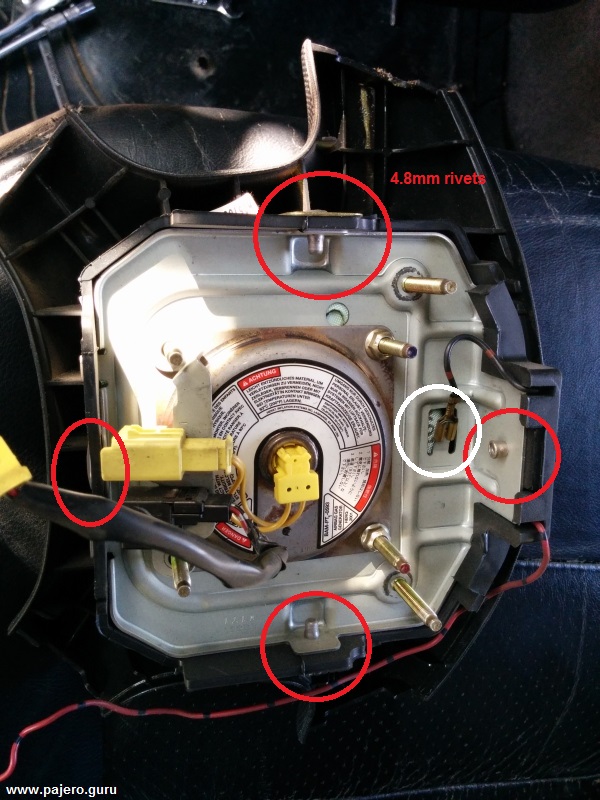
Drill the 4 rivets with the 4.5mm auger. Keep the square metal washers and remember to put them back while installing the new rivets in place.
Disconnect the horn black wire (in the white circle)
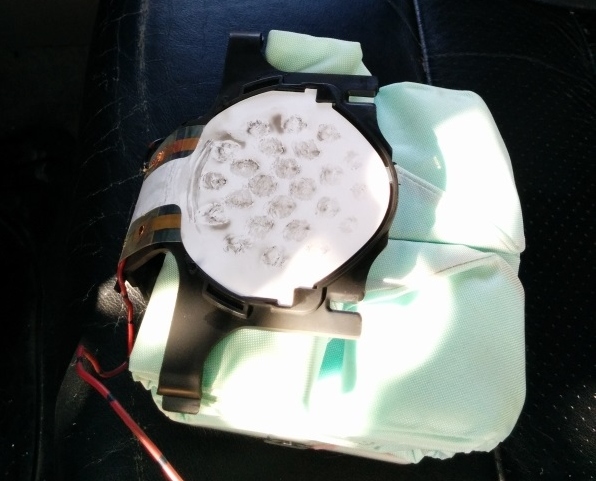
6. Carefully, but really really carefully, pull the airbag out of the rubber cover (the “steering wheel center”).
The white part in the picture covers the metal sheets that we are going to “operate”
7. With extra care, spread the white “paper” cover and see the metal sheets we were talking about…
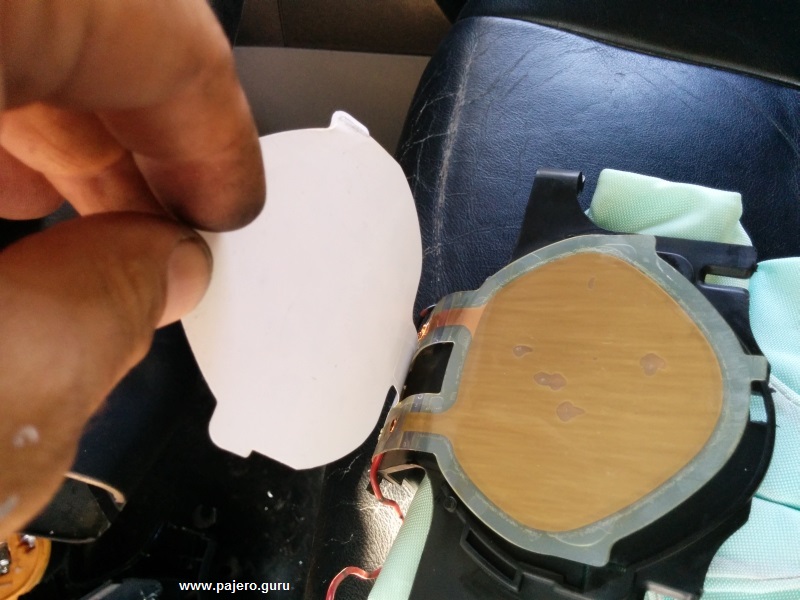
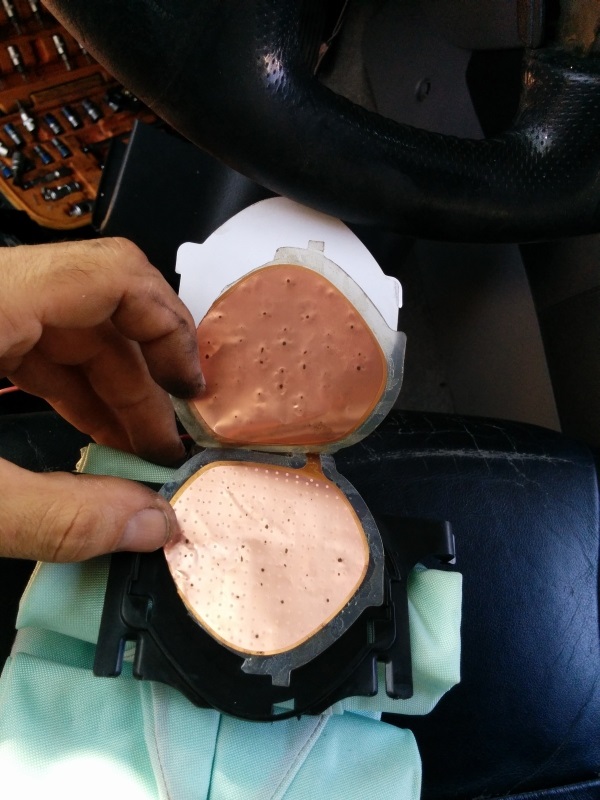
8. Now, You will probably have to cut the clear plastic to gain access to the metal, look in the picture below, where my thumb is, you can see that I cut it there.
Then, spread the 2 metal sheets carefully, all the way – as in the picture.
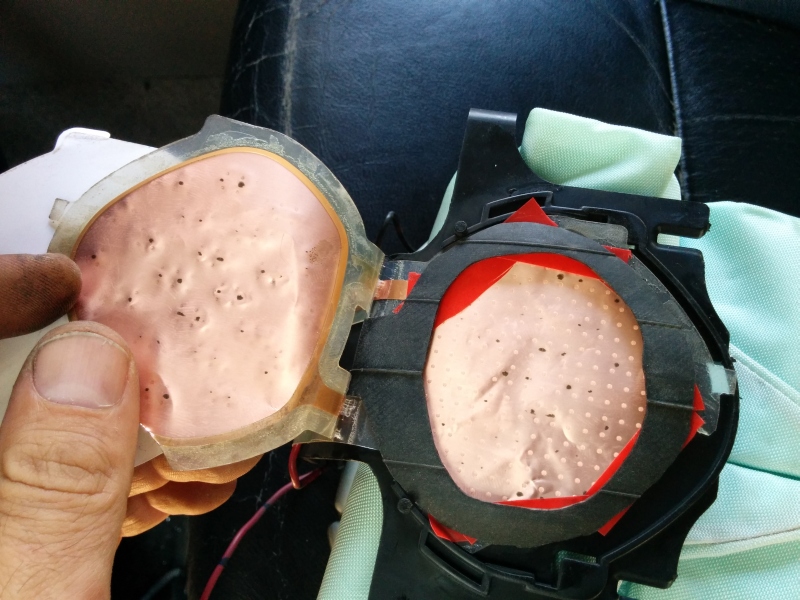
9. Cut and paste the isolating ducking tape around the metal sheet.
10. Cut the rubber stripe as in the picture and put it as you can see below:
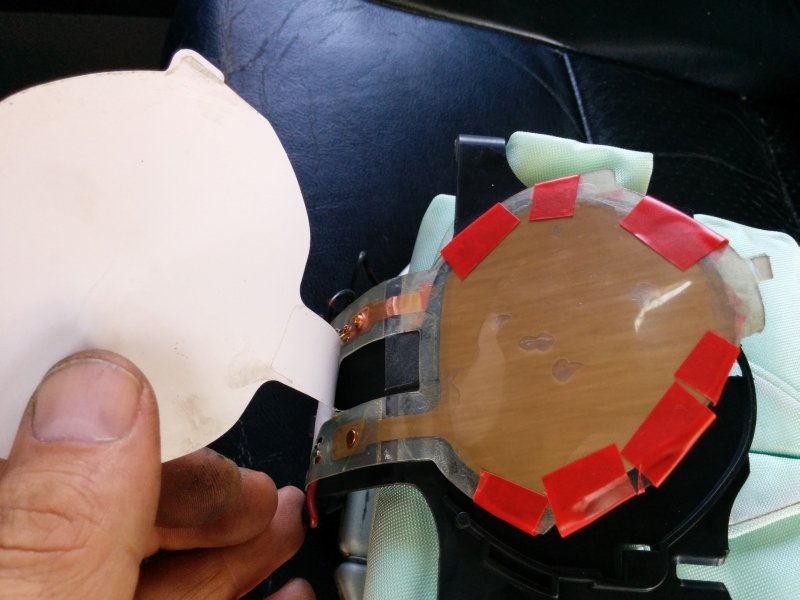
11. Close them back together – The rubber stripe will avoid the metal sheets touching each other till you will push the horn, use the ducking tape to close it. You should have a “sandwich” of:
Nylon-Metal sheet – isolating duck – rubber stripe – metal sheet – nylon
duck them together as in the picture:
12. Put everything back in place, reverse order:
First, put the horn switch that you just handles in place, then, install the air bag – set the new rivets in place, don’t forget their washers.
Connect the back wire and the yellow connector.
Screw the 4x 8mm nuts that hold the airbag in place
Connect the wiring.
Connect the battery.
Now, carefully, keep your head away (maybe doing it from the passenger seat?) turn the switch on and try the horn – is it working? It should be…
Turn the engine on, verify the SRS light is turning off after few seconds and that everything is working as it should.
Good luck.
If you have any questions or comments, please feel free to comment here and share them with us.
Related Posts


About The Author
saar
My name is Saar. I own a Pajero NM after more than 10 years with a Jeep Cherokee. I would like to document every possible information regarding the Pajero here on our site. Please feel free to contact me to add your stuff here.
When my horn started going off on cold nights, I simply put in a switch to cut the circuit at night. But over the next year it kept degrading until it was coming on most of the time and essentially made the horn useless.
I was on the path to this fix here on Pajero Guru, when I checked out eBay and found a complete steering wheel with the air bag module in it.
It was an easy plug and play solution for a total cost of $149 and a afternoon of my time.
So far so good.
$149 is a good price for it.
Usually it costs much more.
I’m glad you fixed that
This article helped me fix my stuck horn. Now I’m good. Thanks!!
My pleasure 🙂
Hi 🙂
Great website, and great post.
I have exactly the same problem, and I’m checking on how to fix it.
I have a question: once you have disconnected the battery and waited, is there any chance that the airbag still blows up when you are taking it apart?
Why in the step 6 you say ” really really carefully”? What can happen?
Thanks a lot!
Well, theoretically, no, it should not blow once you disconnected the battery and waited.
Step 6 – you will take the airbag out, you don’t want it to drop down or change the way it is kept inside the steering wheel, that is why you should be careful.
– step 6-
Ah, ok, so you mean be careful to keep the specific folding of the airbag, right?
thanks very much 🙂
Yes. (and try not to open the folds )
Hi again 🙂
I did the procedure, but instead of open the pad and use rubber and the duck tape, I refilled the pad of oil injecting it with a needle (I think that was the original structure: copper-oil-copper). For some time it worked! But now it is broken again. I guess the oil has gone or dried. At some point, I found the Japanese manufacturer of the pad, but no idea if you could buy one. In the end is just a switch. Do you think or know if it possible to get the replacement anywhere? Even if it is not exactly the same, I guess some other brands used a similar system
Thanks!
I don’t think they sell the “switch” only
Hi, congrats on the post. I have the same problem, but i haven´t done it yet. English is not my mother language so I want to make sure it works for my Pajero that i think is a different one. Do you happen to know if it works?
Oh, another question. can you please upload a pic of the 4x 8mm nuts? i am a bit confused with that. Thanks!
Hi Saar, I did it and worked, was not that easy but it turned out good. The only problem is that the srs light doesnt go off. Any chance that someone can help me with that?
Hi,
Did you reconnect the wires and everything is in place?
Hi Saar, FYI and for the record…. the SRS light remains on if you drive your car with the airbag uninstalled (my case cause i needed to get some tools) so i went to a Mitsibishi dealer and they fix it with the scanner in 2 minutes.
Thanks for the page, i am happy with my horn back!!
Thank you for the important update. I’m glad it works fine for you now
Hi Saar,
This is exactly the problem i had with my 2000 Pajero, what happened after the repair of the horn switch is that the power windows stopped working, the dash dials stopped working, the cruise control, the 4X4 and the indicators stooped but the hazards is still working.
The battery terminals was cleaned, the fuses and relays was all checked.
Please help if you can, i just hope this is not a pricey repair
Regards Johan Willemstijn
Hi,
My guess would be a fuse or a wire that is not connected well.
I would check the wiring near the steering wheel for bad contact/other electric issues.
But I will start with checking the fuses…
Take me half a day and now thanks to you I have my horn making pi pi again you are the best.
Thank you so much.
My pleasure 🙂
The horn problem is a big diseases on my pajero io too, the other problem is switching the engine off when driving in idling or when starting it in idling.
Hi saar. I got the car with horn button on the side and telling me that the air bagbag may not work but the srs was never on, i decided to fix it Aand to replace the clockspring. When i took it out for the p/n the srs light suddenly turned on. Can this tell me that the clock spring and air bad are fine? And only the horn need to be fixed? . On the other hand. I had an acccident and the air bagbag did not open.but it seemed enough to activate the bag So i am alittle cofused. Is there a way to tell if the clockspring is ok? Thx
Roie
Hi saar. Is there a way to ensure the clock spring is fine and only the horn is the problem?
Thx
Hi Saar, Is there a way to check the clock spring?
the car has a switch for the horn . In addition, when i bought it the seller thought that the airbag is not working as well. but no SRS warning light on
the mechanic told me to that replacing the clock spring will solve the issue[s?]. when he took the clock spring outs suddenly the SRS light came alive. Can i assume from this that the spring is ok and only horn need service? is there a way to confirm that the airbag is fine?
Thanks
Roie
Hi Roei,
It sounds like the clock spring was fine.
I don’t know about a way to check the airbag. on the other side, checking the horn is much easier…
start with looking for a cut wire, probably the horn had been stuck and someone cut the wire to stop it, then he installed a bypass…
I will check for the wires of the horn.
I did had a small accident in the front and the airbag didnt inflate so it hought the SRS was bypassed or something . however the SRS probably not bypassed as it came on when the clock spring was taken out. .
Any way. thank you!
Hi Saar,
I have a 2006 Mitsubishi Montero that I purchased Oct 2015 in Florida, USA. I moved it to Northern Virginia area and very soon, the Horn started going off as the nights got colder. Eventually, I decided to remove the fuse in order to get some peace and quite! I tried placing the fuse back on during the summer 2016 but I believe the thing glued together or something because as soon I connected the battery, the horn would sound; hitting the steering wheel did not work. I came across your post almost since I started searching for solutions to this problem. Finally, today, I manned up and decided to embark on repairing my horn using your instructions. $25 US Dollars later (I had to buy a Rivet Gun, Rivets, and a rear floor rubber mat instead of inter-tube) and 2 ½ hours later, job is done! Instead of a flexible extension I used a deep 8mm socket and it worked just fine. Actually, I think using a deep socket was very easy to align and install the upper nuts. I didn’t have to cut the clear plastic to gain access to the metal sheets, no cutting my nails in a week or so helped me work it. I was intimidated by the effort,..primarily I didn’t want to deal with airbag SRS issues which would require me having to go to the dealer and spend some serious money. So far, I have no issues with the airbag. Everything seems to be working just fine. I want to thank you for taking the time to post this solution. It has worked flawless for me and me save a few $$, my appreciated.
Thanks,
Paulo
Hi Paulo,
It is my pleasure 🙂
Thank you,
Saar
PERFECT , 1001 thanks!
Hi Saar,
I have an issue with the indicator on my 2002 NM. I have been unable to locate the flasher relay under the dash. Do you know how to access it and which panels I need to take off to get to it?
Hi,
It can be found under the dash next to the fuses panels.
hey i need to know to change engine mountings of pajero io